Building a Blog: Minimum Viable Blog
When starting a blog as a side project, it’s tempting to invest a lot of time into building the perfect blog before actually starting to write anything. To resist that temptation, I want to start with the “minimum viable blog”. I want to set up the blog with little effort and (probably) iterate later. In this post, I describe the least I could do to get this thing up and running :)

Astro Blog Starter
To make it easy and painless to start building a website, frameworks like Astro commonly provide some “starter” projects – like templates for a basic blog. Astro provides an “official” blog starter1 while the Astro community has added many alternatives2.
The official blog starter covers the basics for a blog with minimal styling3:
✅ Minimal styling (make it your own!)
✅ 100/100 Lighthouse performance
✅ SEO-friendly with canonical URLs and OpenGraph data
✅ Sitemap support
✅ RSS Feed support
✅ Markdown & MDX support
That will do.
Step 1: Set Up the Astro Project
The projects basically sets itself up:
npm create astro@latest -- --template blog
Need to install the following packages:
  [email protected]
Ok to proceed? (y) y

╭─────╮  Houston:
│ ◠ ◡ ◠  Let's make the web weird!
╰─────╯

 astro   v1.6.2 Launch sequence initiated.

? Where would you like to create your new project? › .
✔ Where would you like to create your new project? … .
          ■■▶ Copying project files...(node:21202) ExperimentalWarning: The Fetch API is an experimental feature. This feature could change at any time
(Use `node --trace-warnings ...` to show where the warning was created)
✔ Template copied!
✔ Would you like to install npm dependencies? (recommended) … yes
✔ Packages installed!
✔ Would you like to initialize a new git repository? (optional) … yes
✔ Git repository created!
✔ How would you like to setup TypeScript? › Strict
✔ TypeScript settings applied!

  next   Liftoff confirmed. Explore your project!
         Run npm run dev to start the dev server. CTRL+C to stop.
         Add frameworks like react or tailwind using astro add.

         Stuck? Join us at https://astro.build/chat

╭─────╮  Houston:
│ ◠ ◡ ◠  Good luck out there, astronaut!
╰─────╯
Start the page locally (at http://localhost:3000) with npm run dev.
Step 2: Provide Imprint and Privacy Policy
To comply with European laws, you need an imprint and a privacy policy. I used free generators and templaes and looked at other developer blogs for inspiration.
- https://gdpr.eu/privacy-notice/
- https://dsgvo-muster-datenschutzerklaerung.dg-datenschutz.de/?lang=en
- https://www.e-recht24.de/muster-datenschutzerklaerung.html
- https://boredconsultant.com/privacy-policy/
- https://www.kai-waehner.de/data-privacy/
- https://www.kai-waehner.de/imprint/
Step 3: Host the Site With Cloudflare Pages
Setting up a website on Cloudflare Pages is simple and can be done within minutes. You mainly point it at a GitHub project and fill in a little bit of configuration.
The Astro website describes the process in seven small steps3
- Set up a new project on Cloudflare Pages.
- Push your code to your git repository (GitHub, GitLab).
- Log in to the Cloudflare dashboard and select your account in Account Home > Pages.
- Select Create a new Project and the Connect Git option.
- Select the git project you want to deploy and click Begin setup
- Use the following build settings:
- Framework preset: Astro
- Build command: npm run build
- Build output directory: dist
- Environment variables (advanced): By default, Cloudflare Pages uses Node.js 12.18.0, but Astro requires a higher version. Add an environment variable with a Variable name of NODE_VERSION and a Value of v16.13.0 or higher to tell Cloudflare to use a compatible Node version. Alternatively, add a .nvmrc file to your project to specify a Node version.
- Click the Save and Deploy button.
Cloudflare provides its own instructions for deploying Astro Pages at Deploy an Astro site
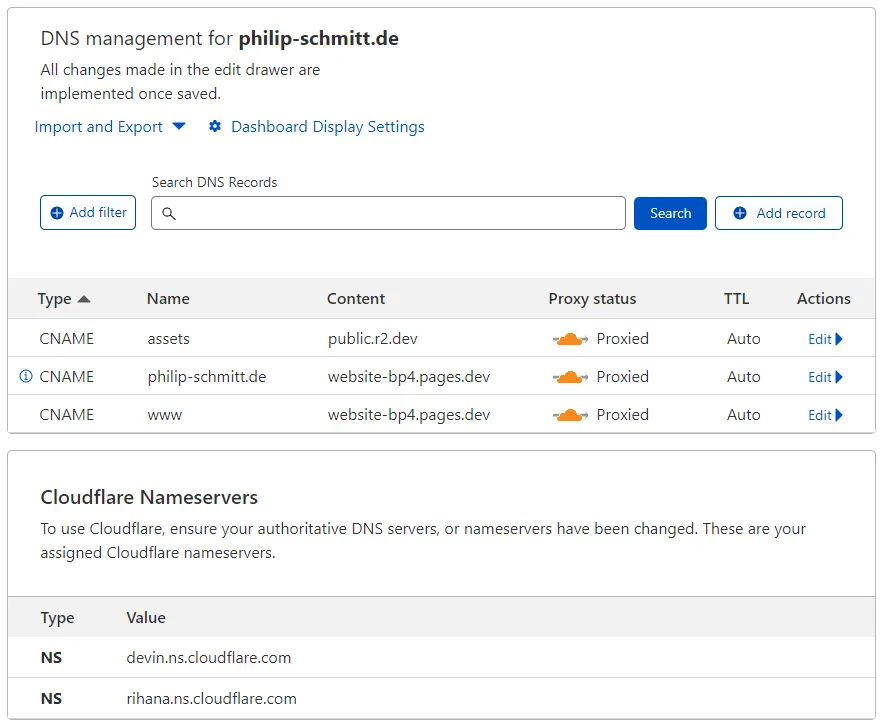
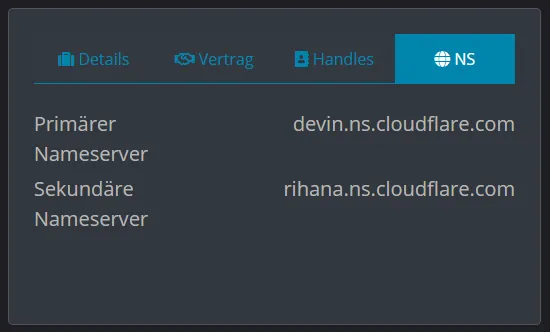
Step 4: Use a Custom Domain
Rough steps:
- Buy a domain at any place where domains are sold.
- Add you domain as a “Website” in the Cloudflare dashboard
- Configure the DNS records in the Cloudflare dashboard to point at your Cloudflare Pages website
- Configure the Cloudflare nameservers for your domain where you bought the domain
Step 5: Profit
Setting up a basic blog is simple and quick. I spent the most time on imprint and privacy policy and virtually no time on the actual website.
Now it’s time to write.
My Commits
- Initialize Astro Blog Starter
- Add imprint and privacy policy
- Replace privacy policy template
- Simplify imprint
Footnotes
-
Astro Blog Theme ↩
-
Astro Blog Themes ↩
-
GitHub withastro/astro Astro Starter Kit: Blog ↩ ↩2